Thursday, September 30, 2010

Creative Challenge: Day Thirty

Is it just me or does Halloween always sneak up on you too? It's one of my favorite holidays - mostly for the costumes, fall leaves and candy corn - but it always catches me a little off guard. Year in-and-out I vow to plan a costume earlier in the year so that when the end of September rolls around, I'm putting the finishing touches on my costume, not just starting it. 

Yesterday it hit me, once again, that Halloween is just one month away! Needing some creative inspiration I spent some time on MarthaStewart.com in Halloween Central. I found so many fabulous ideas, from simple to elaborate, for costumes, decorations and all things party. 

I thought this bee catcher outfit would be good for B and I could dress up as a bumble bee or just a bee hive like this
I also thought this jelly fish costume would be simple and has the potential to be fun and unique. 

 While costumes are still TBD, I thought I'd at least get started on making our apartment a bit more festive. Using one of the Martha Stewart templates, I cut out some little bats. Combined with my oyster gray divine twine, I thought I'd make a bat garland. 

I traced and cut out bats on black card stock. Using a silver pen I gave them all eyes so that they are friendly, not frightening. 

I then punched a small hole in their wings to string them on the twine.

I hung them above the stairs in our landing area. I thought they'd appreciate the cave like atmosphere. This is also the one place we pass by the most in the apartment, so we're sure to get full enjoyment out of these guys.  
They even look cute, as silhouettes, with the lights out! 

I promise to keep you posted on our costumes. My goal is to make them myself and spend less than $50 (for both). Wish me luck!

Wednesday, September 29, 2010

Creative Challenge: Day Twenty-Nine

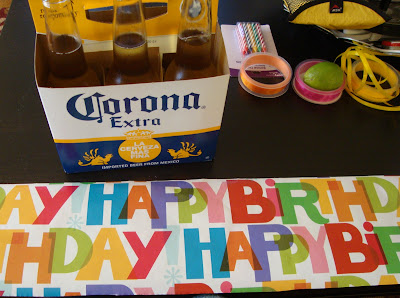
This evening I'm going to a birthday party for a friend of a friend. I know said friend of friend well enough that I was excited to receive an invitation to her party! I didn't want to show up empty handed but only wanted to do something small, thoughtful and fun. After some minor brainstorming, I came up with a festive 6-pack of beer!

On my way home from work I stopped at the store to get candles, a 6-pack of Corona and a lime. I already had the wrapping paper and ribbon.

I cut a strip of the wrapping paper - just enough to cover the base and not the bottles. I then adjusted the paper so you could read 'happy' along the front. I used a little bit of glue to attach the paper to the case.

The next step was getting the candle to stick in the lime. I used a small knife and cut X in the top of the lime. When the candle wasn't quite squeezing in, I cut another X in the opposite direction. Fits perfectly and even sits up-right on it's own!

I made a small card that says "wishing you a very happy beerthday". The card is tied to the handle with ribbons. I place the lime in the case and tada - it's a party in a box!
 This was incredibly easy and, I think, turned out really cute. I will definitely be using this idea again! Same idea could also be used to wrap a 6-pack of Izzy Sodas or sparkling waters.

Tuesday, September 28, 2010

Creative Challenge: Day Twenty-Eight

  I am a fan of ribbon. I like to use it on cards, to tie up packages and sometimes in the form of a bow. It was no surprise that when I found out about bakers twine, I wanted to get some. From what I've read, bakers twine is the new black. How can you not want to get your hands on that?

During one of many trips to Michael's I looked around for this cute, colorful bakers twine. After talking with a few employees and an overhead announcement to the entire store, I realized they had no idea what I was talking about. 

That's when I went with a tried and true Google search. Thankfully I stumbled upon what most crafters probably already knew, Divine Twine is where it's at. Not only is the brand name completely adorable, the twine is earth-friend AND it's made by a bay area company.

After more of an internal debate than I care to admit, I decided to purchase cherry red and oyster gray. These spools arrived in my mailbox a few short days later.

 Along with my purchase were a sample bundle of the other options of twine. GENIUS marketing strategy, because now I want them all. With the samples and my very own cherry and oyster, I made a few little cards. This first one was really fun to make. I felt like I was an elementary school kid doing an art project!

I love how cute the string is all on it's own. To tie up a package or wrap around a card, it adds a little more character with a nice punch of color. 

When I bought the cherry colored twine it made me think of cherry candy and doesn't it look like candy canes? This card was completely inspired by candy - the sugary treat and my mom! While making this I realized my cursive is a little rusty, however I was impressed with how easy it was to glue twine, in a cursive pattern, to the card.

I am now a fan of ribbon and bakers twine! I will definitely be using my divine twine for many upcoming projects!

Monday, September 27, 2010

Creative Challenge: Day Twenty-Seven

Earlier this month Debbie shared how to make a banner card. I was delighted to see how simple it was to make with very adorable (and seemingly time consuming) results. Needing to make a few birthday cards, this seemed like a perfect opportunity to try my hand at banner cards.  

I picked a double sided piece of paper and made a fold. I then cut 6 similar sized triangles. I was worried about making them all the same size, but I actually really like that they're all a little different.

For contrast, I flipped half of the triangles to the other side. 

I then placed all the triangles out along a piece of hemp twine. When I was happy with their placement, I put a small dot of glue in between the two pieces of paper to close the flag. I glued them close to the tip so that they could still slide along the twine. 

I knotted each end of the twine and glued just the knots to a card. For a final touch, I added a Happy Birthday sticker. 
I am still in shock of how quickly and easily this came together. It might be one of my new favorite cards to make! Thank you for the inspiration, Honey Bee! 

Sunday, September 26, 2010

Creative Challenge: Day Twenty-Six

Last night we went to the Vampire Weekend concert at the Greek Theater in Berkeley. It was a gorgeous evening for an outdoor concert. I've really been looking forward to seeing Vampire Weekend and they did not disappoint; they were awesome!!
We ran into a guy wearing a shirt that said Des Moines...the greatest city in the world. It was so funny we had to get a picture for B's friends/family. Turns out these two went to the same high school (sweet Valley High) but 5 years apart. Small world!

Inspired by the concert last night, I decided it was time to make a new mix of music. While I'm not ashamed of my love for one man bands, I am pretty lucky to live with a guy who is continually finding new, great music to expand my iTunes library. I spent some time going through his music today. I also purchased a few new songs myself. Together they make up my Fall Mix!
  Tighten Up - The Black Keys
I Want You Back - Colbie Cailat
Giving up the Gun - Vampire Weekend
Little Lion Man - Mumford & Sons
(Sittin' On) The Dock of the Bay (Live) - Sara Bareilles
The High Road - Broken Bells 
Who Says - John Mayer
Poker Face - Glee Cast Version
Cath - Death Cab for Cutie
Home - Edward Sharpe & The Magnet Zeros
Mushaboom - Feist
I and Love and You - The Avett Brothers
Horchata - Vampire Weekend
Sweet Disposition - The Temper Trap
October - Broken Bells 

Saturday, September 25, 2010

Creative Challenge: Day Twenty-Five

As I mentioned on Tuesday, two of my favorite people - Layna and Janelle - celebrated their birthday. 
 I've known these lovely ladies since kindergarten. Growing up they were the oldest of our group, meaning they got to drive first, turn 21 first, etc. Fortunate for me, I got a lot of free rides from them for the 8 months before I could drive. Ahhh, so may classic memories in the silver Camry!

In honor of their special day, I wanted to mail them each a little something festive. Rather than the typcial birthday card route, I decided to make them birthday crowns! Why not spend the last year of your twenties sporting a crown? I say go out in style.

My inspiration for crowns came from the Paper Source (ahem, children's) royal crown kits. I picked a crown for each and flipped through my paper stash to find that coordinated well.
Using the Cricut, I cut out 3.5 inch block letters for LAYNA and NELLY (fits better than Janelle on a crown!). Funny side note - I thought the glitter paper was pretty and festive. Looks good, but such a mess. Note to self: glitter is an outside toy. 

After gluing the letters to the crown, I added rinestones to the each point. For added glitz, I used a silver pen to make smaller jewels. I also used the silver pen to outline the letters. I think it really made them stand out a little more. 

Since these crowns were also a birthday card, I used this happy birthday stamp on the back of the crown. I stamped with versa mark and traces over the writing with silver and black ink. I also included a more personal message on the inside of the crown.

 To complete and close the crown, I added two brads to the end. Not knowing their exact size, I didn't punch holes in the other side, so I wrote a little note for the girls to fit the crown to their head and then punch holes.

 Here are the final products before I sent them off in the mail! To mail, I put each crown between two pieces of cardboard and then used a usps express mail envelope.

And here are the birthday girls, sporting their crowns!
 Layna is currently in school for her teaching credetial. She asked to steal the idea for her future elementary students. I think they are fabulous for birthdays of all ages, royal celebrations and just regualr ol' days when you want to feel like a Queen or King!


Speaking of birthdays...wishing another dear friend, Sara, a very HAPPY day!!

Friday, September 24, 2010

Creative Challenge: Day Twenty-Four

When we moved into our apartment 3 months ago there were a few things I was really excited about that quickly faded. One was our "cute" antique oven. Turns out it's just really old and more beast than beauty. The other thing was having a clothes line in our backyard. I imagined doing laundry and hanging it out to dry. In preparation for this I quickly bought a 50 pack of clothes pins. Turns out we mostly do laundry on the week nights and it's more efficient to just throw every thing in the dryer at once. We're trying to make the most out of our $1.50 per load. 

Have no fear, I quickly found many uses for my bargain clothes pins. I grabbed a handful and put them on top of the fridge. Soon they were our new chip clips - used on chips, nuts, even items in the freezer and fridge. I also clipped one onto the mini blinds in the kitchen. I use it to pin-up whatever recipe I'm following. This way the recipe is eye level and doesn't get dirty. I put some with my craft stuff to hold pieces of paper together that are drying.

While browsing in blog land the other day I stumble upon this post about decorate clothes pins. It honestly never occurred to me to spruce them up; I was going more for function than fashion. In the spirit of the creative challenge I thought WHY NOT, and so I grabbed my clothes pins and flipped through my paper.
I trimmed several pieces of colorful patterned paper down to size. I then grabbed my favorite glue and got to work.
  
I quickly had a jar full of fun, colorful clothes pins.

 These two patterns are my favorite!

Stephanie suggested wrapping a few in a little package and presto - gift idea. I couldn't agree more! 

Thursday, September 23, 2010

Creative Challenge: Day Twenty-Three

One of the best and most useful gifts I've ever received was this engraved recipe book. It's leather bound and has just the right amount of categories and plastic sleeves to store my recipes. It's a perfect combination of two of my favorite things: cooking and organization! 
 I currently have subscriptions to Real Simple, Cooking Light and Sunset magazines. When I read them, I dogear the pages of things I find interesting or want to reference later. A majority of the pages end up being recipes or gift ideas. The recipes make it to my lovely recipe book and sadly the other interesting tidbits sit in the magazines stacking up on the shelf.
 
 In an effort to make better use of all the wonderful things I've marked, I decided to make an idea binder. Much like my recipe book, I wanted tabs that were easy to flip to whatever I'm looking for. Lucky me to stumble upon the back-to-school supplies and find this cute binder:
After a quick flip through some of my dogeared mags, I came up with a few categories for my tabs:
BEAUTY
FASHION
GIFT IDEAS 
HEALTH
HOLIDAYS
HOME
INSPIRATION
PARTIES
TRAVEL
QUOTES
I added some plastic sleeves and ta-da - idea binder is done! I can now organize and easily reference all those great ideas.

Wednesday, September 22, 2010

Creative Challenge: Day Twenty-Two

Happy first day of Fall!!! I welcome the Pumpkin Spice lattes, warmer layers (especially the Uggs) and college football with open arms. While I am not so jazzed about the steady decrease in daylight hours, I am a fan of the changing seasons. Here in NorCal the change is less drastic, but I must say there's been an extra crisp feeling in the air that's screaming fall.

My very favorite part of fall is the changing leaves on trees. I can't get enough!! I have a feeling I'll have to wait until our trip to Chicago in October to see some colorful branches. In the meantime to get in the spirit I picked up a colorful stack of paper from Michael's. 

During my date with the Cricut on Sunday I cut out a lot of leaves, trees and birds to make some fun fall cards. Here are a few of the leaves before they were made into cards...

And here are some of the cards I made...

Tuesday, September 21, 2010

Creative Challenge: Day Twenty-One

Today I had a bit of a creative challenge catastrophe (triple word score, thank you very much). I had a few ideas but none of them worked out for today. I also thinking I'm feeling a little burned out. I have to stop and pat myself on the back for 20 days of creativity and blogging; this is a first for me! However, a task still needed to be done. 

I contemplated staying home to make something, but decided to go to Rachel's instead to watch the Glee preimere as planned. I should have known she'd be baking! Not only did I have to the opportunity to enjoy the smell of fresh baked goods, ensure top quality of her products with taste tests, I also got to make a few of my own 'cakes for the sake of my challenge. As I mentioned earlier this month, I'm not much of a baker. So this was a fun challenge and seemingly fool proof with the guidance of a professional.

The vanilla batter was already made, so I simply spooned it into liners. I followed R's lead and sprinkled a a few white and milk chocolate chips into each.

 After their brief session in the oven, I let them cool while we watched Glee. Being the multi-tasker that she is, Rachel frosted her project while we enjoy the premiere and a glass of wine.
 
 Once cooled, I was given a quick frosting tutorial. I appreciate the tips, because had I frosted these on my own, they would not have looked like this at all. The results here have given me the confidence to frost more, it was really pretty easy, but only if I have a frosting bag!
Last but certainly not least are the decorations - large white sprinkles, fine pink sugar and one small pink flower with pearl center.
Thank you to Rachel for teaching me a new skill and saving day 21 of the creative challenge. I now have all the proof I need that a few cupcakes really can save the day!!

On an unrelated note, HAPPY BIRTHDAY to my favorite twin-set, Layna and Janelle! I will be sharing their birthday treat later this week.