Showing posts with label cards. Show all posts

Tuesday, September 27, 2011

Greeting Card Box

I try to be the card maker who plans ahead and makes batches of cards in advance, getting birthday and holiday cards in the mail on time. Truth is, I am usually whipping them together the night before. In the end it all gets into the mail the same way, but I would love to be more prepared.

For me, part of that is also having a place to store cards so that they're not mixed in with all my other craft supplies. I've seen greeting card boxes - with handy divided sections for just because, birthday, thank you, etc - at Hallmark (although I cannot find a link to one!) and thought it was such a great idea. I decided it was high time to make one for myself.

After a few weeks of searching for the right size box to hold a variety of card sizes, I settled on this floral printed gift box from Michael's. Although I like mums, I do not love the print on the box. I did love the size, magnet closure top and the price of $4 (coupons are the BEST!). I knew I could find a nice piece of paper to cover this, and I was right. I purchased a sheet of the wood grain kraft paper at Paper Source for $2.50.
 
I measured the paper and cut it into two strips in order to properly cover the box. Using book binding glue, paint brush, scissors and a bone folder I got to work. I did the bottom, back and lid first. Then I used the second piece to wrap around the front and sides. The inside of the box was light orange, and will be filled with cards, so I was not concerned with that.

While the box dried I spent some time purging my scrap paper. I recycled a lot of odds and ends, and held on to some of my favorite patterns to make a sign for the front of the box.

Using the Cricut and a variety of cartridges, I made the word CARDS!


I was hoping the letters would pop out a little more, but with pattern on pattern, they were getting lost. At the suggestion of always the clever IHB, I put the letters on a piece of light pink paper.

Ta-da: my very own greeting card box!


A peek inside...


and a side view...


I love it! This was so easy to put together it makes we wonder why I waited so long. Oh well! This weekend I'm hoping to spend some time making cards to fill 'er up!


This post is part of my September Creative Challenge. Thanks for following along as Inspired Honey Bee and I do something creative Monday - Friday all this month. Final week!!

Monday, September 26, 2011

Hooray: a card for celebrating


I am not the only one with exciting news these days. In fact a lot of people around me are movin' and a shakin'. I love when life presents you with a reason to shout HOORAY! I can't think of a more perfect way to celebrate from a distance than sending a happy card!

My friend Kaci is the mover and shaker I made this card to celebrate. In the 5 years I've known her she's always been a go-getta. It's one of the reasons I love her most; she can appreciate the here and now, but also works hard toward her goals.

Her most recent accomplishment is joining a new office for her growing counseling practice! She'll now be seeing clients in an adorable (so I hear!) office in the Highlands. In addition to the move, she just recently took the steps to obtain an L.L.C. I cannot wait to visit the new office, but even more to watch her business continue to grow! You can read more here.

As I wrote this happy HOORAY card, I realized she actually has a lot to celebrate these days. In fact, here's a countdown to the all for all of it! So here's to shouting HOORAY for all the good things life is handing you these days.

Here's the best part: the day I put this card in the mail, I received an encouraging card from Kaci. Great minds think, and celebrate, alike.


See other hooray cards here. This post is part of my September Creative Challenge. Thanks for following along as Inspired Honey Bee and I do something creative Monday - Friday all this month. Final week!!

Wednesday, September 21, 2011

Greeting Card Round-Up

Anyone who knows me can attest to the fact that I love making cards! With so many wonderful patterns, shades and textures of paper, not to mention ribbon, stickers and other accessories the possibilities for crafting the perfect card are ENDLESS.

That being said, it might come as a surprise that I also really love purchasing cards. I have a soft spot in my heart (and wallet) for letter pressed, pretty paper and clever/humorous or heartfelt cards. I never miss a chance to peruse the card section at gift shops or even the drug store. I can totally appreciate the time, energy and talent that goes into making them. Plus, my cards are crafty and not necessarily humorous. Often life calls for a humorous card, so I am thankful for so many talented card makers out there!

In honor of my two of my favorite ladies birthday today, Layna & Janelle, I thought it would be fun to do a round up of some of my favorite sources for cards.

First up is Curly Girl Designs! I was introduced to these cards by my curly haired pal, Jess. Over the years I've received a few of the cards (from Jess) that I've held onto because I love the message and artistic collage style so much. This birthday one is so cute...

{Curly Girl Designs}

Next up, Snow and Graham. *sigh* lots of letter press cards and beautiful paper, which I just can't resist. They sell many of their products at Paper Source. This card is not necessarily just for birthdays, its for anyone who rules!

{Snow and Graham}


Next up, Papyrus! Their stores have long been a favorite of mine with lots of pretty cards and wrapping paper. They have gorgeous line of handmade cards, which I'm sure you've seen on sale at Target too (love that!)! I just had to share this one because I'm pretty sure that's Pippin (Layna's cat)...

{Papyrus}

Oh Paper Source, how I love thee. In addition to all their lovely paper products and materials for crafting, they carry tons of great greeting cards. This one especially made me laugh...

{Paper Source}

Last but certainly not least, Seltzer Goods. This company is new to me, but I've already purchased several of their cards because they are so funny. Spoiler alert: This one is particularly perfect for Jnelly and I bought it several weeks before her birthday! We worked at DQ together for several years, so I HAD to buy it...
{Seltzer Goods}

If you send cards, do you have a favorite place to buy cards? Or do you prefer to make them?


This post is part of my September Creative Challenge. Follow along as Inspired Honey Bee and I do something creative Monday - Friday all this month!

Tuesday, September 20, 2011

Ric Rac and Fringe


While packing up for our move, I did my best to purge throughout the apartment. There is nothing worse then moving junk across town, much less across the country. This purge also, thankfully, took place in the craft closet.

I recycled a lot of old, partially used materials. There were a few pretty patterns of cards that I haven't used in a while, but couldn't part with. I decided they were the perfect thing for a creative challenge...an upgrade to make them more usable. 

I took these old patterned cards and ric-rac flat note cards  ...

and turned them into these ric-rac and fringe thank you cards...

with coordinating lined envelopes!


I think they are a million times cuter and perfect for writing a quick thank you or simple note (i made some of the cards without ty stickers).

Materials used:
Ric Rac flat note cards
Off white envelopes

Tools used:
Sewing machine
Straight edge scissors
Glue

To make the fringe, I folded a 1 inch thick piece of paper in half. Using my (new) favorite fringe scissors, I cut along the unfolded side.

Ta-da: fringe!!
They are so much fun. I highly recommend purchasing or borrowing a pair STAT!

Next I stitched the fringe onto the ric-rac cards, using the same ric-rac stitch. I simply sewed along the crease in the fringe paper. Using regular scissors I clipped off the extra fringe and thread along the edges.

Here's an up close of the fringe...

With the remainder of the pattern paper, I lined the off white envelopes. To do this I simple traced the envelope onto the pattern paper. I then cut it down to size, leaving room for the envelope seal. Place a small amount of glue along the triangle part of the liner and carefully slide into envelope. Note: Its best not to glue the whole liner, just the top, so that the envelope can open and close without tearing.


This project proves, yet again, that it's good to purge! You never know what unused craft materials can be used for a new project!

This post is part of my September Creative Challenge. Follow along as Inspired Honey Bee and I do something creative Monday - Friday all this month!

Sunday, May 8, 2011

You're the Best!

Happy Mother's Day to all the moms out there! Wishing you a beautiful day.


This is the Mother's day cards mailed to my Mom, Grandmas and soon to be mother-in-law, because they truly are the best!


Pink floral paper and you're the best stamp from Paper Source.

Monday, April 11, 2011

Baby Love

Have I mentioned lately how many people around me are having babies? 9 - that I can think of off the top of my head and that doesn't count 2 babies born recently. We are officially to the time in our life where friends are having babies! 

While it's exciting, I'd be lying if I didn't say it's a little crazy because I'm not there yet. I'm happy to know that while I get there (you know tie-the-knot, maybe buy a house), I can love on all these babies! Not to mention expand my party planning skills to incorporate baby showers. 

So while they have (ahem) been busy making babies, I've kept myself busy making cards to celebrate...


I found these hilarious Parenting Flashcards at a local shop. They remind me of someecards. I bought a set as a potential gift, but decided to spread the love (and hilariousness) by making them into cards. 


Congrats to all you baby mamas and papas!
XOXO

Friday, March 25, 2011

Creative Recycling (thank you cards)

For all the people who tell me they aren't creative (but I know you really are)I'd like to share with you an EASY way to make homemade cards. Think of it more as recycling, than being creative.

When I receive cards, I put them on display on the fridge or my dresser to enjoy. Every few weeks I do a clean sweep and these cards are put in two categories: sentimental cards I save to enjoy reading again at a later date, and a majority of the cards I keep only the front of the card to reuse. 

Here's a batch of thank you cards that I made into a new set of cards.

Original thank you cards

New cards - thanks again!


Here are up-close shots of all the cards and a few details...
For this card I used scalloped scissors to resize the original card.
I used brass brads to mount the card on kraft cardstock.
I used only the 'thank you' portion of the card. I rounded the edges and
mounted it on a piece of  a recycled envelope (similar to this) and attached them to a blank white card.
This was the trickiest card, although not too hard. I carefully cut the 'thank you' out of the card and mounted it on a tag. I then mounted the entire tag on the original card, carefully covering the hole.
I only used the 'thank you' portion of this card. Using a piece of brown paper and brass brads, I attached the thank you to a card made of kraft and patterned paper. 
I simply trimmed the edges and mounted this on light gray cardstock. 


Tuesday, February 15, 2011

Valentine Cards

Even though Valentine's Day was like sooo yesterday I wanted to share some Valentine creativity. I'd intended to share this post yesterday, but as you can imagine I was a little distracted

Whether you love or hate the holiday, there is no denying the possibilities for creativity. In my eyes the holiday is not about flowers and chocolate, its about thoughtful gestures for those we love (which to some might be flowers and chocolate). My favorite part, as I've mentioned too many times before, is making cards to send to the people I love most! 

Last week Rachel hosted a Valentines, Candy and Wine party (similar to the monster cupcake and gingerbread village holiday parties).  The purpose of the party was to get a bunch of ladies together to gossip, drink wine and make valentine cards and cupcakes.
In addition to hosting, Rachel baked the cupcakes and provided the frosting and decorations. I brought blank cards, pattern paper, stamps and my beloved cricut. The rest of the group was encouraged to bring any items that could be used for cards (glitter, ribbon, crape paper, markers, stickers, etc) and a beverage or appetizer to share.


  Twelve lovely, and extremely creative, ladies showed up and dove right in to the card making. I was beyond impressed by the creativity; each card was unique and made from a variety of the materials. I was also shocked that only two bottles of wine were consumed amongst all those ladies. In between showing people how to use the cricut I made a card for my valentine. Here are most of the cards made that night many of which are for these ladies valentine's.


HVD {Happy Valentine's Day} by Sandy


Be Mine by Debbie

Crape paper ruffles by Debbie

Robot Love by Rachel
inside says: that's robot for i love you!

I freaking heart you by Jordan (a PA student, can you tell?)
inside says: you make my heart skip a beat

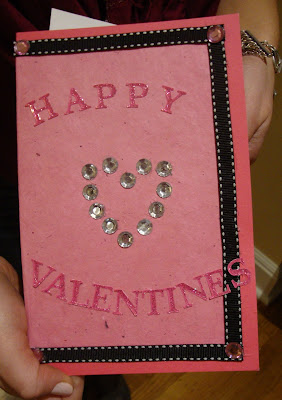
Happy Valentines by Christina

Doilys and crape paper by Jess

I like you a latte by Surime
she made this whole cup. the details are impressive!

I heart JB byAriane
Happy Valentines by Ashlee
I love the mix of felt, twine and cricut letters


I love you {a latte} by yours truly
the actual size is 8.5x11. i used cricut letters, a latte picture from a magazine, crape paper behind the latte, and debbie's lace paper edger (love that sucker!)
  
The card above was made for my funny valentine, barista and fiance (woah!). I also got him Whiskey Rocks and a bottle of his favorite whiskey. B gave me a sweet card and got me set up with renters insurance (practical and totally appreciated) to cover my new bling! We had a nice low key evening at home. I made dinner, we shared our answers to this qui
 and watched Despicable Me.
 
For all the other loves in my life, I made a variety of cards using paper I had on hand. My favorite part of the Valentine's were the heart envelopes I mail them in. I made all of the envelopes using the Multicolor Wrapping Paper from PS (same paper I used to make the paper heart garland). I can't imagine opening a mailbox and not be excited to find these cute, bright hearts. I heart them.


Also worth mentioning...yesterday was my six year anniversary with KP. Not a significant milestone by any means, just hard to believe I've had a real job for seven years. Prior to working at KP I worked at the AHA. I will always remember my KP anniversary for the irony - I left the AHA and started at KP on Valentine's day.