Showing posts with label gift idea. Show all posts

Friday, December 16, 2011

Pinterest-a-thon: Rein-beers

At the office we are doing a holiday "secret elf" exchange. I drew a guy's name, which has been a tad challenging because I have only met him once. I've tried my very best to get thoughtful, manly stuff while sticking to the strict $15 budget. 

Today is the big elf reveal and I could not, for the life of me, think of what to give as a final gift. That's when I realized, just because I have a guy doesn't mean I can't still do something a little crafty. You know how much I love making gift 6 packs (see birthday, baby), so this rein-beer 6 pack seemed like a fun and festive idea!

Pinterest Inspiration
After confirming he drinks alcohol and that my idea wasn't too lame or inappropriate for the office (since I am the new girl and all), I purchased the supplies to make my very own 6 pack of rein-beers!


It was SO EASY to put together and cost me approximately $12.


Supplies:
6 pack of beverages - I went with New Belgium Trippel
Brown pipe cleaners
Small multi-colored pom-poms
Wiggley eyes
Wrapping paper
Glue and scissors


 1. Unload the beers. Wrap the base of the 6 pack box or leave it plain, especially if the beer is a winter ale!
2. Wrap pipe cleaner around bottle top and make bunny ears. Kink into desired antler shape. Add an extra piece of pipe clear if you want larger antlers.
3. Glue on googly eyes.
4.Glue on a small pom-pom nose. I used one red pom-pom for Rudolph and brown for the rest. Ta-da: rein-beer!


I put them all back into the box their sleigh and attached a Santa gift tag. Hello - someone's gotta be a designated driver.
 

Since you cannot buy wiggley eyes, pom-poms or pipe cleaners individually AND this was so fun, I will be making more of these rein-beer 6 packs in the future!

Thursday, September 22, 2011

Gift Idea: Just because

Today I have another wonderful guest post by my dear friend, Jess! One of the things I love most about Jess is her thoughtfulness. Case in point, the sweet little gift she's going to share with you today...

I love giving gifts. The best kind of gift to me is one that is unexpected and for no reason or occasion at all, except because I want the recipient to feel loved.  When I saw this post on Smilemonsters, I had the perfect person in mind that could use a little reminder of how special she is.  Plus, who doesn’t love a little stash of happiness to break into on one of those rough days at work?!

First, I went to the good ol’ standby – Target – to find a plastic, reusable cup to stuff full of goodies.  While there, I found little snacks and other helpful/cheery/practical travel sized items to fill it with.

Deluxe Mixed Nuts (because regular mixed nuts just wouldn’t cut it for this special gal!)
Tinted Burt’s Bees lip balm (she’s quite fashionable and sometimes a little lip color can really brighten up your day)
Orbit gum (for that just brushed clean feeling)
Advil (we ALL need some, some days…)
Hand sanitizer (we do work in a hospital after all)
Chocolate bar (for that afternoon sweet craving)

Then I went to work on creating a personalized tag to tie onto the straw.  I know this particular friend is a huge Hawkeye fan, so I knew I wanted to stick with a black and gold theme (because who DOESN’T love the black and gold!)

I found this cute large polka dot paper on clearance at Michael’s.

I used the ribbon spool to make perfect circles and traced out two for the tag and glued them together so the pretty paper was on both sides.

I picked up some sparkly stickers (disclaimer – I love bling) that would really show on the black paper.

I stuffed all the goodies in the large cup, trying to arrange so she’d be able to see everything in there (I did remove things from their packaging to squeeze it all in).

Topped with a little gold ribbon and the personalized tag, it was ready to go!

She was very excited to receive the surprise and I was the recipient of a big hug and a happy smile!  And the best part? I’ve seen her using the cup around the office every day since she received it!

I hope you’ll use this idea to bring a smile to someone you know, or at least be inspired to give, just because. Be sure to stay tuned for more September Creative Challenge – you never know, I might make a repeat appearance!

So thoughtful, Jess! I especially love the bling letters and shout-out to the Hawks! Thank you so much for sharing this sweet little gift!! 

This lovely guest post is part of my September Creative Challenge. See the other guest posts from this month here and here. Thanks for following along as Inspired Honey Bee and I do something creative Monday - Friday all this month. 6 more days to go!!

Sunday, May 8, 2011

The Reading Mother

I recently helped plan a bring a book baby shower for a co-worker. I was talking to my mom about the shower and she reminded me about The Reading Mother poem. I was so happy for the reminder, because it was a perfect addition to the shower!
 
When my mom (who, for the record, read to me) gifts baby books to new mothers, she'll put the last stanza of the poem in the front cover of the book:
You may have tangible wealth untold;
Caskets of jewels and coffers of gold.
Richer than I you can never be --
I had a Mother who read to me.

In this case I opted to use the whole poem and frame it. At the shower we read the poem prior to gifting the books.


I HAD A MOTHER who read to me
Sagas of pirates who scoured the sea,
Cutlasses clenched in their yellow teeth,
"Blackbirds" stowed in the hold beneath

I had a Mother who read me lays
Of ancient and gallant and golden days;
Stories of Marmion and Ivanhoe,
Which every boy has a right to know.

I had a Mother who read me tales
Of Celert the hound of the hills of Wales,
True to his trust till his tragic death,
Faithfulness blent with his final breath.

I had a Mother who read me the things
That wholesome life to the boy heart brings-
Stories that stir with an upward touch,
Oh, that each mother of boys were such.

You may have tangible wealth untold;
Caskets of jewels and coffers of gold.
Richer than I you can never be --
I had a Mother who read to me.


Whether you use the whole poem or just the last paragraph, it is a sweet addition to a baby gift!

Monday, April 11, 2011

Baby Six Pack

In addition to making baby cards, I've also been putting together baby shower gifts. Last weekend I put together this baby six pack for a friend's shower.   


Prior to heading to Babies R Us (where I am beginning to think I should take them up on the rewards card) I viewed the gift registry to look for themes. When I saw the bottles and brushes still available, my creative wheels started turning. Remembering this birthday six pack, I thought it could be cute to make a baby six pack filled with bottles, bottle brushes and other things to occupy baby when not sleeping or with said bottles.  

baby six pack ingredients: bottles, brushes, pacifier and clip
reused 6 pack container
Using an empty six pack container and paper I had on hand, I transformed the six pack container to be baby (boy!) friendly. Looking back, I should have cut out the handle area prior to gluing it all together, but thankfully those crocked lines were hidden by the contents!


I wrapped each item individually to look like a bottle, tying the top of each with ribbon. The brushes were packaged together, so they look nothing like a bottle, but thankfully are somewhat hidden in the back of the pack. Here is a side view...


The baby six pack was completed with an oh BOY! card tied to the handles. When opening gifts at the shower, my friend immediately knew this was from me. Am I that obvious? :) 


With so many cute baby clothes and gear, a gift can easily go from simple and thoughtful to expensive. While I ended up spending a little more than I had planned, this same idea could be created at any price point. 

Friday, February 18, 2011

Piece of (paper) cake!

Whenever possible, I like to personalize gifts. When a creative, paper loving friend is getting married of course I have to do more than just an item off the registry. Not that it's expected, it's just a perfect excuse to try a new paper craft project!

For Debbie's bridal shower I purchased the 
Pottery Barn Gabriella Cake Stand from her registry. What better to sit atop a simply beautiful cake stand than a paper cake! A quick Google search lead me to the blog How About Orange  with a how-to on paper cake slices. Perfect! Even more perfect was the link to Paper Source template and instructions on making these sweet slices. 


Using the template and several pieces of patterned paper (in the wedding colors) I made eight slices of cake - four chocolate and four vanilla. I arranged the slices on a doily, seven of the slices in a circle and one piece sliding out, and taped the doily to the cake plate.


While the slices didn't sit on the stand perfectly flat or cozy up next to each other very well, I think they turned out incredibly cute (if I do say so myself)!


In an effort to not create more waste, I used the Pottery Barn bag to wrap the gift. I spruced up the bag with a festive gift tag. To make the tag I used a the same paper as the cake slices and Tie-the-Knot Cricut cartridge. I mounted them on a piece of pretty paper and attached them to the bag with ribbon!


~

Notes:  To make a full cake, you'd want to make 10 slices.
Definitely use a thick paper such as card stock.
Cake slices are adorable and time consuming. 
Don't let anyone mistake your charming creation for actual cake (it doesn't taste the same!)

Sunday, February 13, 2011

Sikora's in the City

Well hello blog. I've missed you. Life has been busy so I've been away. Now it's time to catch up!


Last weekend Stephanie and Mark (aka the Sikora's) spent the weekend with us in the city by the bay! As always, we had a great time with them. The weather was absolutely perfect and the weekend a good balance between activities, relaxing and lots of laughing. 

Here are a few picks from the weekend...
Friday we spent the day in San Francisco with the bay area's newest resident, Sandy, shopping, eating and walking. After lunch we stopped at Blue Bottle for lattes and a cookie!
me, Sandy and Stephanie
 Saturday we headed to the wine country. At the recommendation of several people, we visited the Russian River area. Awesome smaller wineries, friendly people and free tastings! Here we are at Hook & Ladder winery.
Stephanie, B, Mark, Ashlee and me
 Sunday morning we got up early and headed into the city for the KP 5K in Golden Gate Park. That's right all star employees thriving on a Sunday morning! Here we are flexing with some characters from ETP.


The race finishes across the street from Ocean Beach. We walked over to the beach and tried to put our feet in. Don't be fooled, the water is still freezing even when the sun's out.
Mark and Stephanie
For their arrival, I made Stephanie and Mark welcome cards and small gifts. 

This was Stephanie's third visit to the bay so I made her a photo collage to welcome her back to the city by the bay! I printed the collage on a 5x7 and made it into a card. I got her a bottle of Sofia bubbly to enjoy while here.

Since Sikora is close to Sequoia, I wanted to make Mark something to do with the national park. I mentioned this to B and using his mad photoshop skills, he transformed a photo from our trip to the park this fall. Isn't that awesome? I printed the photo on 5x7 and made into a card with wood grain paper. At Cost Plus I put together a 6 pack of local area beers for Mark to enjoy while in town. I used the same wood grain paper to wrap the base of the 6 pack.

Thanks for the fun weekend, Sikora's!

Thursday, January 20, 2011

Bay Area Welcome Bag

Today my dad and step mom arrive to the Bay Area for a long weekend. We are happy to have them visit! You might be thinking, hmm wasn't your mom just there? Yep, welcome to parent weekend number two (this weekend will also be the first time they'll meet B...dun, dun, dunnnn). We love having visitors, not only because it makes us feel popular, but we enjoy playing tour guides around town. 

While in town, they will be staying at a hotel near by. While I'd love to have them stay with us at our huge house one bedroom apartment, I think we'll all be more comfortable. It's always nice to have a little something extra at your hotel, so I put together a very Bay Area welcome bag for them. All of the items come from California, with a large majority coming from Berkeley! 


Included in the bag: 
Bison IPA (Berkeley and because its a bison, which my dad will totally appreciate - go buffs!) 
apples (wherever apples are grown in CA) 
Blue Diamond almonds (Sactown) 
ScharffenBerger chocolate (Berkeley) 
peanut butter cookie mini Luna bars (Berkeley)  
bottled water 


I put all the items in an old Anthropologie bag and tied it up with a golden gate greeting (as seen in top photo)Here's an up-close of the greeting card. Bridge photo taken by B, aka Brian Adams  as my dad says (in reference to Ansel Adams).


Thursday, December 16, 2010

Welcome to the 'hood!

One of my co-workers is moving across the bay this weekend - from San Francisco to Oakland. Not only are she and her hubby moving into a newer, bigger place, they're also expecting their first baby (her due date is actually within a day of Melissa's)!

I've been wanting to get them a little congratulations something-or-other and was thrilled when I found this adorable onesie in a cute kids boutique on Piedmont Ave.

Not only do they have adorable gear for tots, they also put it in a cute box with a ribbon. I added a little congratulations card and ta-da a lovely little welcome to the (neighbor)hood gift!

More info on Crackerjacks here

Wednesday, December 15, 2010

I heart the Trader Joe's Cookbook

I received this cookbook from Rachel for my birthday. I know, my birthday was a while ago, but I have finally had time to use this sucker. True to its title, I truly heart the Trader's Joe Cookbook! 
{image via}


As I mentioned when I shared my list of favorites/go-to items from TJ's, it took me a while to truly navigate the store. There are so many unique items, I'm just not always sure how to prepare them. Thank goodness for the I heart Trader Joe's Cookbook because it makes meals out of items that can all be found at TJ's. The recipes are also very simple and have a 75% success rate in our house (unsuccessful =  the southern greens pasta. A for effort)


Here is a sneak peak inside the cookbook and my favorite recipe (so far): 


Don't have a TJ's nearby? You could improvise most of the ingredients. 


10 days until Christmas...not too late to add this to your wish list or pick it up for the TJ's lover in your life!

Monday, November 15, 2010

Baby Bunting Banner

Over the weekend one of my college friends,  a soon-to-be mama, was in San Francisco with her hubby. They are expecting their first baby, Georgia Leigh, on January 22. Since this was the last time we will see them before the big day, a few of us went in on a gift for them. In addition to this adorable owl and a few classic children's books, I made them a baby bunting banner (say that three times fast!).

 I was inspired to make this by none other than the Inspired Honey Bee who made a similar banner for her besties' baby showerWhile I'm still not 100% sure what to call these cute banners (bunting banner? pennant banner? flag banner?), I settled on bunting banner because when you say baby bunting banner you can't help but smile.

Wanting to make the banner bright, colorful and girly, I settled on the pack of paper called Greehouse by K&Company. Not only is the paper really cute, it's also double sided with a large pattern on one side and a smaller coordinated pattern on the back. 

Using the Cricut, I cut 4.5 inch circles from 6 different patterns of paper. Using the same 6 patterns, I free hand cut 12 flags. I then used the Cricut  and plain card stock to cut out 4 inch letters to spell 'Georgia Leigh' in white and a shadow in brown. Since the banner paper was so bright, I knew a shadow on the letters would help them stand out better.

Once I had everything cut out, I layed out all the flags plus their corresponding circle to make sure I had them in the best order (don't want flags of the same color/patternright next to each other!). Then I got busy gluing all the pieces together.

After they all dried I folded the top of the flag back to create a small flap. Using these flaps and a small piece of clear tape, I attached the flags to a long piece of hemp cord.
 

Once the banner was complete - photo shoot and all - I accordion folded the flags with the hope of keeping the letters in order and the strings tangle-free.


I had tons of scrap paper left over, so I made this card to go along with the gift.

Saturday, November 6, 2010

you make my heart go BOOM

In our house, the word BOOM is used fairly often. It originates from the game John Madden Football for Super Nintendo, circa 1990. "BOOM, heck of a play" is the actual quote. B and his brother P shortened it to just BOOM. Most days it makes me laugh, other days I ask to take a break from using the word BOOM, but for the most part I've embraced it.

The other day I stumbled upon Vol.25 a blog/Etsy shop with adorable art posters. According to the artist "they're made to give at least one person the warm fuzzies." Imagine my delight when I saw this one:
{via}
Too perfect not to get for the guy in my life that not only makes my heart go BOOM, but uses the word on a regular basis. Plus the turtles remind me of one of my favorite commercials, the Slowskys.  

It immediately went into my cart and I continued to browse. I could have easily purchased tons of other prints, however only went with the BOOM poster...for now. It arrived just in time to put on B's desk for when he returned home last night. In the envelope were some free postcards too, including a mini version of this, lucky me!

Friday, October 29, 2010

Personalized Wedding Gift: Picture Frames

Last summer when we visited Chicago, I fell in love with this photo collage in Emily and Ryan's guest room.  

I even went to the boutique and looked through all the letters but couldn't settle on anything I loved enough to have it spelled out. B also pointed out that it would be fun to take our own pictures if we were to do this. Genius - I love a good D.I.Y. project!

Inspired by their Chicago collage and a photo idea I saw earlier this year, I suggested to B that we personalize their wedding gift. My idea was take photos of pretty, artistic numbers of their wedding date (10-16-10). I also wanted to somehow incorporate a picture of Hyde (their last name) street in San Francisco. We ended up taking a bunch of different pictures and settled on these as our favorites:
OCT from a concert venue sign in Chico
16th Street in Sacramento
2010 address in Sacramento
the corner of Hyde and Francisco in San Francisco

I searched their registry and picked two frames from Pottery Barn, which happened to also be on sale! Using Picassa, I made several versions of each picture with different tones and filters. I'm happy I printed multiple versions, because on the computer I loved the black and white (like their Chicago collage), but in the frames the Sepia tone looked the best. 

And here is the final product wrapped up, tied with ribbon and ready to be carried on planes, trains and taxi cabs! 

We included a note with the frames explaining our inspiration for the gift, the extra copies of the photos (in case they prefer the B&W) and also a disclaimer that we won't be offended if they use their new frames for say, their gorgeous professional wedding photos. We had fun taking the pictures and have no doubt they'll appreciate the thoughtful gesture. 

***

Imagine my delight when I saw this awesome wordle collage at their rehearsal dinner. One of the bridesmaids made it as a wedding gift. It includes words and dates from the first day they met (at CareerBuilder, Ryan was on the panel that interviewed Emily!) up to their wedding day, 10-16-10. Another great gift idea!

Wednesday, September 29, 2010

Creative Challenge: Day Twenty-Nine

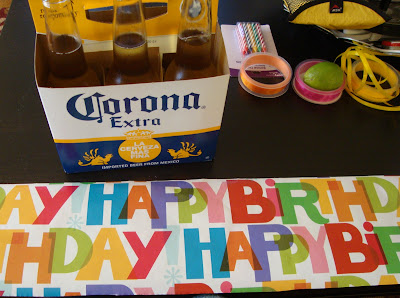
This evening I'm going to a birthday party for a friend of a friend. I know said friend of friend well enough that I was excited to receive an invitation to her party! I didn't want to show up empty handed but only wanted to do something small, thoughtful and fun. After some minor brainstorming, I came up with a festive 6-pack of beer!

On my way home from work I stopped at the store to get candles, a 6-pack of Corona and a lime. I already had the wrapping paper and ribbon.

I cut a strip of the wrapping paper - just enough to cover the base and not the bottles. I then adjusted the paper so you could read 'happy' along the front. I used a little bit of glue to attach the paper to the case.

The next step was getting the candle to stick in the lime. I used a small knife and cut X in the top of the lime. When the candle wasn't quite squeezing in, I cut another X in the opposite direction. Fits perfectly and even sits up-right on it's own!

I made a small card that says "wishing you a very happy beerthday". The card is tied to the handle with ribbons. I place the lime in the case and tada - it's a party in a box!
 This was incredibly easy and, I think, turned out really cute. I will definitely be using this idea again! Same idea could also be used to wrap a 6-pack of Izzy Sodas or sparkling waters.