Showing posts with label baby shower. Show all posts

Wednesday, March 20, 2013

Stephanie's Baby Shower


Two weeks ago I co-hosted a baby shower for my dear friend, Stephanie! She is due with her first baby - a girl - in a few short weeks. Doesn't she look fabulous?

I'm sharing all the lovely details of her baby shower on Inspired Honey Bee. You can view the post right here

All this year I'll be a monthly contributor on Inspired Honey Bee. You can read January here (valentine cards), February here (gift I made for Stephanie's baby girl).

Monday, October 3, 2011

Baby Banner Gift Bag

Over the weekend was a baby shower for Chelsea and her little fella, who is due at the beginning of December. Although it would have been so great to be in Durango to attend, it just wasn't possible to get there. More possible was wrapping up some cute clothes and mailing them for the shower!

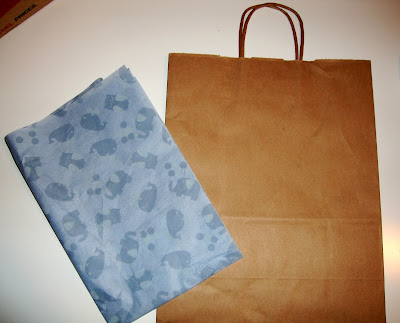
It's always tricky to mail a gift to be presentable for a shower. You never know if the wrapping will survive the trek. At the advice of IHB, I decided to wrap the items in the adorable tissue paper provided by Baby Gap and mail them with a gift bag to be assembled prior to the shower!

I didn't find a gift bag that coordinated with the tissue paper, so I decided to make my own! I choose a brown kraft paper bag to work with.

You know how I feel about banners, especially for babies (see here and here), so I pulled out this stamp as my inspiration.

To make a baby sized banner for the bag, I cut four banner flags out of this fun blue chevron paper.

Using the Cricut I cut four denim colored circles and paired them with the letters b-a-b-y (using scrap paper from this project).

I glued all the pieces together, lay them out on the gift bag and FAIL. Baby banner is too big for the bag!! I mostly wanted to share this picture to prove that projects do not always pan out as planned, but you probably already knew that :)

I quickly changed my plan and went for round circles and baby fit perfectly! Hooray, tragedy averted!

I punched a small hole on each side of the bag and strung the banner on some twine. I then tied the banner onto the gift bag.

Ta-Da: Baby Banner Gift Bag!


After I snapped this picture, I unpacked the bag and carefully placed all the items in a box. I mailed all the items to Chelsea's mom who kindly re-assembled the bag and took it to the shower on my behalf!

I think today marks two months until we all get to meet Baby Krueger! I cannot wait to snuggle him in this. In the meantime, we can gush over this new cute fella, Dylan Teuber, who was born last week!! Congrats to his parents Lisa & Doug! 

Monday, September 19, 2011

How-to: Build a Baby Quilt

  Today I have another fun guest post from my friend and soon-to-be new mom, Crystal! She was the happiest, cutest pregnant lady ever.
{Stephanie Smith Photography}
I asked her to share a clever idea she did for her baby showers. She built a baby quilt, using squares made by her friends and family!! I'll let Crystal share the rest...

It really was not too hard to make...really if my mom and I can do it....seriously anyone can do it! :)  I love the way it turned out and it is going ot be such a wonderful keepsake.  You can totally feel all of the love from all our family and friends sewn right up in one little snugly blanket!!


Here's how we did it:
1. I pre-cut 6 1/2in. fabric squares.  I cut enough for all the guests at my showers and the border of the quilt.  I chose 4 different patterned fabrics, but you could do whatever you liked.  I used a basic cotton fabric.


2. I had all of my wonderful guests create their own square while at the baby shower.  It was so much fun and people were nervous at first but then they totally got into it! In the baby shower invitation we included a little card that told people they would be making a quilt square in case there was anything special (quote, ribbon, iron on, etc.) that they wanted to bring but that all the supplies would be provided if not.  We made sure that we had tons of different iron-ons, ribbons, buttons (make sure those are all sewed on super tight so baby can't pull them off) fabric markers, letters, irons set up and ready to use, and needle and thread stations too.

  Once people were done we set them all out on a table to they could check them out throughout the rest of the shower.  The only guidelines we gave people was to please leave a 1/2in border to help with the sewing and to make sure that their name was on the square somewhere.  (If people forgot their names I just wrote them on the square so I would always remember.) For friends and family that couldn't attend the showers, I mailed them a fabric square with some directions via email and they created their square and mailed it back to me. 

3. Once the showers were over and I had all the quilt squares back, we began by laying out all the squares and deciding on a pattern and size that we liked. 
 
We then pinned and sewed the squares together to create the front side of the quilt. 


PS-Check out the sewing machine from circa 1950 we used...we are totally high tech sewers! See what I mean, if we can do it anyone can do it!


4. After the front side was completed we cut the back panel of fabric to size.  I used a cotton quilt backing fabric, but any cotton fabric would do.  We sewed the back panel to the font.  You have them both inside out and sew them like you would a pillow before it was stuffed.  Don't sew the whole thing, leave yourself about a 1-1 1/2 ft. opening. It's best to leave this opening on the bottom of the quilt.


5. When the back is sewn on, turn the quilt right side in and catch your first glimpse at how cute it's going to be.  You then need to stuff the quilt with batting.  We used a 1/2in batting, but you can choose any size depending on how fluffy you want the quilt to be.  Once we stuffed the quilt with batting, we sewed the closing shut.

6. Then the finishing touch is to use embroidery thread and sew little knots between each square.  This holds the batting in place and gives the quilt it's "quilt like" look.  That's all!  You can then admire your finished project and get excited to wrap a cute baby up in such a special quilt! :)
On Thursday morning, Crystal and her husband welcomed this bundle of joy into the world!! I cannot wait to meet him. HUGE congrats to your family. Thank you for sharing your sweet baby quilt.

This post is part of my September Creative Challenge. Follow along as Inspired Honey Bee and I do something creative Monday - Friday all this month!

Sunday, May 8, 2011

The Reading Mother

I recently helped plan a bring a book baby shower for a co-worker. I was talking to my mom about the shower and she reminded me about The Reading Mother poem. I was so happy for the reminder, because it was a perfect addition to the shower!
 
When my mom (who, for the record, read to me) gifts baby books to new mothers, she'll put the last stanza of the poem in the front cover of the book:
You may have tangible wealth untold;
Caskets of jewels and coffers of gold.
Richer than I you can never be --
I had a Mother who read to me.

In this case I opted to use the whole poem and frame it. At the shower we read the poem prior to gifting the books.


I HAD A MOTHER who read to me
Sagas of pirates who scoured the sea,
Cutlasses clenched in their yellow teeth,
"Blackbirds" stowed in the hold beneath

I had a Mother who read me lays
Of ancient and gallant and golden days;
Stories of Marmion and Ivanhoe,
Which every boy has a right to know.

I had a Mother who read me tales
Of Celert the hound of the hills of Wales,
True to his trust till his tragic death,
Faithfulness blent with his final breath.

I had a Mother who read me the things
That wholesome life to the boy heart brings-
Stories that stir with an upward touch,
Oh, that each mother of boys were such.

You may have tangible wealth untold;
Caskets of jewels and coffers of gold.
Richer than I you can never be --
I had a Mother who read to me.


Whether you use the whole poem or just the last paragraph, it is a sweet addition to a baby gift!