Monday, September 19, 2011

How-to: Build a Baby Quilt

  Today I have another fun guest post from my friend and soon-to-be new mom, Crystal! She was the happiest, cutest pregnant lady ever.
{Stephanie Smith Photography}
I asked her to share a clever idea she did for her baby showers. She built a baby quilt, using squares made by her friends and family!! I'll let Crystal share the rest...

It really was not too hard to make...really if my mom and I can do it....seriously anyone can do it! :)  I love the way it turned out and it is going ot be such a wonderful keepsake.  You can totally feel all of the love from all our family and friends sewn right up in one little snugly blanket!!


Here's how we did it:
1. I pre-cut 6 1/2in. fabric squares.  I cut enough for all the guests at my showers and the border of the quilt.  I chose 4 different patterned fabrics, but you could do whatever you liked.  I used a basic cotton fabric.


2. I had all of my wonderful guests create their own square while at the baby shower.  It was so much fun and people were nervous at first but then they totally got into it! In the baby shower invitation we included a little card that told people they would be making a quilt square in case there was anything special (quote, ribbon, iron on, etc.) that they wanted to bring but that all the supplies would be provided if not.  We made sure that we had tons of different iron-ons, ribbons, buttons (make sure those are all sewed on super tight so baby can't pull them off) fabric markers, letters, irons set up and ready to use, and needle and thread stations too.

  Once people were done we set them all out on a table to they could check them out throughout the rest of the shower.  The only guidelines we gave people was to please leave a 1/2in border to help with the sewing and to make sure that their name was on the square somewhere.  (If people forgot their names I just wrote them on the square so I would always remember.) For friends and family that couldn't attend the showers, I mailed them a fabric square with some directions via email and they created their square and mailed it back to me. 

3. Once the showers were over and I had all the quilt squares back, we began by laying out all the squares and deciding on a pattern and size that we liked. 
 
We then pinned and sewed the squares together to create the front side of the quilt. 


PS-Check out the sewing machine from circa 1950 we used...we are totally high tech sewers! See what I mean, if we can do it anyone can do it!


4. After the front side was completed we cut the back panel of fabric to size.  I used a cotton quilt backing fabric, but any cotton fabric would do.  We sewed the back panel to the font.  You have them both inside out and sew them like you would a pillow before it was stuffed.  Don't sew the whole thing, leave yourself about a 1-1 1/2 ft. opening. It's best to leave this opening on the bottom of the quilt.


5. When the back is sewn on, turn the quilt right side in and catch your first glimpse at how cute it's going to be.  You then need to stuff the quilt with batting.  We used a 1/2in batting, but you can choose any size depending on how fluffy you want the quilt to be.  Once we stuffed the quilt with batting, we sewed the closing shut.

6. Then the finishing touch is to use embroidery thread and sew little knots between each square.  This holds the batting in place and gives the quilt it's "quilt like" look.  That's all!  You can then admire your finished project and get excited to wrap a cute baby up in such a special quilt! :)
On Thursday morning, Crystal and her husband welcomed this bundle of joy into the world!! I cannot wait to meet him. HUGE congrats to your family. Thank you for sharing your sweet baby quilt.

This post is part of my September Creative Challenge. Follow along as Inspired Honey Bee and I do something creative Monday - Friday all this month!

Thursday, September 15, 2011

Power to the pedals!

This Saturday my friend/co-worker, Mass (short for Massachusetts. she calls me Colorado), will hop on her bike and ride from San Francisco to Los Angeles. Its an epic ride: 525 miles in 8 days all along the coast of California.

For several months she has trained, raised money and will ride in the California Coast Classic Bicycle Tour all to benefit the Arthritus Foundation. Prior to training she'd never been a distance cyclist. It's been so fun to hear about her journey in new equipment (bike shorts, riding jerseys and clip-in pedals), see her photos from training rides and cheer her on as she's made new personal bests on time and elevation gain.
 
I wanted to do a little something special in preparation for her big day. I had some fun bicycle paper (made by Recollections - I Wanna Ride) so I made her a good luck card for others at work to sign.


Using the same paper, I also made a simple triangle banner to hang in her cube!

I put them in her cube at the end of the day yesterday to greet her first thing this morning. She was surprised and so appreciative - hooray!!


Not only am I excited for her, I'm beyond impressed! In case you haven't already done the math - that's a lot of riding per day. In fact, one day she'll be riding for 8 hours! Yep, a full work day of pedaling. Thankfully it is along one of the most beautiful coastlines in the world. So please join me in wishing her GOOD LUCK and power to the pedals!! Thankfully she's already taken her spill while clipped into pedals (a rite of passage), so it should be smooth sailing down the coast!


This post is part of my September Creative Challenge. Follow along as Inspired Honey Bee and I do something creative Monday - Friday all this month!

Wednesday, September 14, 2011

Yosemite Ave Mini Book

Two weeks ago we moved out of our beloved apartment on Yosemite Ave. Sure it had its quirks but it had so much charm and character too (and I'm not talking about us two). Most memorable is that it was our first apartment together after spending nearly three years living 90 miles apart. When I saw the posting on Craiglist for a cute apartment, within our price range on Yosemite, a place near and dear to our hearts, I was sold. Thankfully the landlord agreed and so we lived there from June 2010 until the beginning of this month.

Last year I took an online workshop to learn the art of making mini books (aka as the BIG mini workshop by Elise). The workshop was fun and inspiring! I learned these books are a great snapshot of memories, like a scrapbook, but mini. To me they feel easier, less pressure to fill an entire book of 12x12 page. Rather bundle up as many memories as you wish and bind them together. Sadly until now I have not put my learning to use. As the end of our time on Yosemite Ave grew closer, I started a collection of little things I wanted to remember within a mini book.

I knew creating an entire book (all the paper) was a little more than I could pull together while moving and job searching. So I looked at Elise's shop and realized she had a custom album option - perfect! After a few emails, a paypal transaction and one short week, this album arrived in my mailbox! It measures 4x6 inches with thick card stock front and back, filled with a variety of patterns, colors, sizes and textures of paper all held together with two binder rings. Icing on the cake cover is our house number.

Over the weekend I went through all my pictures and printed several at the local CVS. After several hours of this...


I finished this sweet not-so mini book jam packed with memories of our time on Yosemite Ave! I love it. As you can see I added more to the cover. I think the row of houses on this paper was made for this book.


I wasn't joking about packed, check out the side view! I had to buy larger binder rings to hold it all together. A majority of the thickness is from all our house warming cards I included in here!


To start the book, I decided to make categories so there was a flow. I sorted all of the pictures into piles. Apparently I'm stuck on tabs, because I decided this book needed them too!
 
And here's a look inside the first page! On the left, a photo of the actual numbers on the door. On the right, welcome home - the start of the book!


Throughout the book I included several little details. For example - here is our spare key, which I glued to the other side of the "welcome home" page seen above!


The first section is Home Sweet Home: a photo tour of the apartment from the front door through the house and into the backyard. Although not shown here, I added some creativity into the "tour" by cropping pictures in different sizes and shapes to capture the most important aspects. Below on the left is a photo from our engagement session standing on the front porch, on the right is a nice daily workout - the stairs into the apartment.


Next section is Neighborhood which included photos of the places we frequented the most. We were so fortunate to live off Piedmont Ave! I will miss that street so much (already do!). To the left is a totally Oakland shirt outside of my favorite shop - Nathan and Co. To the right is a collage of most of favorite spots (minus Catos Ale House, which has a full photo on the next page!).


 Party time! And the next section, Parties! I wanted to remember the parties we threw, starting with our housewarming. On the left is a velum envelope where I tucked photos from the housewarming party. On the right are the cards we received from friends and family when we moved in! Beyond the cards are more pictures from parties we hosted.


Visitors We were fortunate to have so many people come visit and stay with us! 
As a thank you to many visitors, I made Bay Area "welcome bags" as seen on the left. On the right is a photo from our visitors this time last year! Beyond that are single photos from all the other visitors.


Holidays Of course I included photos from holidays, aka my craft projects, all of which I've shared here on the blog.


We had some great photos and other random things from around Oakland that I wanted to include, so I made Oak-town, (San Fran is often referred to as "the city" and Oakland as "the town", hence Oak-town).

This might be my favorite little part. Memories: a mini envelope, with loop closer, which I made to include the memories not captured by photos. I already started a mental list, but plan to fill out this part when I'm with B next. I know I will cherish this whole book, but especially reading back the funny, everyday memories.
The last page is a photo of the moving truck and all our stuff! It was a sentimental day watching our lives be packed up and taken out. I am so excited for our next adventure, in Colorado, but will always remember our time in California and especially on Yosemite Ave!


I LOVED this project! I haven't made a scrapbook in years and this process reminded how much I love to compile memories in a creative form. I'm not sure what the theme will be, but I plan to make more in the future. Next time I think I'll try to start from scratch on my own. However, I wouldn't hesitate to order another book from Elise, because I loved the quality and randomness chosen by someone else!


This post is part of my September Creative Challenge. Follow along as Inspired Honey Bee and I do something creative Monday - Friday all this month!

Tuesday, September 13, 2011

Succulent Inspired Boutineers

Did you see this one coming? I would hate to leave the gentlemen out on this creative adventure! Plus I had left over materials from my succulent inspired flower bouquets, so the natural thing to do was make succulent boutineers, of course!

Here is some of the inspiration for making the boutineers, courtesy of Pinterest:

1 | 2 | 3 | 4
To put these fella together, I trimmed each succulent down to boutineer size and paired it with a flower. For the blue rose succulent, I kept it solo because it's pretty enough on it's own! I wrapped the base of each with a thin strip of burlap.

Clockwise from the top:
Blue Rose succulent
Silver Dollar Jade succulent with white dahlia 
  Eucalyptus leaves and berries with purple mum
Vera Higgins succulent with small purple flowers (can't find their name!)


My favorite is the blue rose, with the eucalyptus and mum coming in at a close second!

Similarly to the bouquets I shared yesterday, this project was fun but took much less time!  I do have to say, the succulents were much easier to work with for the boutineers due to the fact they're on a much smaller scale!


 This post is part of my September Creative Challenge. Follow along as Inspired Honey Bee and I do something creative Monday - Friday all this month!  

Monday, September 12, 2011

Succulent Inspired Flower Bouquets

Last year during the September Creative Challenge I planted these lovely succulents.
They were so easy to maintain and fun to watch grow over the past year. As you can see, they really grew!! I moved these succ-kers with me to the Cotton's house with a plan to work them into this year's creative challenge. 

In addition to my love of succulents, I love flowers! It's a love that stems from my first part time job working at a flower shop, where I spent three years basically playing with flowers. I learned the basics of arranging but mostly just learned to appreciate all the beautiful, unique flowers that exist (oh and worked the cash register, cleaned, etc).

So now that it's time to really start looking at wedding flowers I am enjoying every minute of it! I've started a Pinterest board with some of my favs. In reality I will end up choosing what's in season and fits within our budget, but it's really fun to look and pin!

Succulents seems to be all the rage these days. They add such a nice pop of green within a bouquet and if you grow them yourself, they can be so affordable. Here are some white and green with pops of purple bouquets that I like:
1 | 2 |  3 | 4
  With all of this lovely inspiration, I decided I should try my hand at making my own succulent bouquets! Especially since I had full grown succulents to work with. The first is a white, green and hints of purple bouquet that I would envision for a bride's bouquet. 

I picked up flowers from the farmer's market and several flower shops in the Walnut Creek area. I was trying not to spend too much money, so I stuck to: white dahlias, white/light purple lisianthus, green/light purple hydrangea, eucayptus and my favorite succulent, the blue rose. Here's how they came together:
(top = front view, bottom = top view)


For bridesmaids (and who knows, maybe me too) I envision more colorful bouquets. I'm completely in love with the purple bouquets! Here are a few that I adore:
1 | 2 |  3 | 4
 It was a little tricky to pick a variety of purple flowers and hope when combined they would compliment each other well. I purchased: mums, stock, lisianthus, sterling roses and combine them with vera higgins succulents. Here's what they look like in bouquet form:

This project was fun and challenging. I love how the purple bouquet turned out, more so than the white one. As one of the ladies I purchased flowers from shared with me, working with succulents is tricky! They're heavy and their crisp leaves break very easily. So I might be rethinking succulents in bouquets, but that doesn't mean they can't be else where in our big day! 

This project reaffirmed two things for me: 1: I really do love flowers! It was so fun to shop around and arrange them. When I win the lotto I will quit my job and open a cute flower shop. I even have a name picked out! 2. I am definitely NOT doing my own wedding flowers. I had only considered it for a split second several months ago, thinking it could be fun. No, too stressful. Instead I will dream up ideas of what I love and put it into the hands of a trained professional!

I know what you must be thinking: what are you going to do with two flower bouquets when no one is actually getting married? Its a valid question. I disassembled the two bouquets and made them into one happy floral arrangement. They're now sitting in a vase on the bar at the Cotton's house where we can all enjoy them!


Special thanks to my bouquet model! Check out what she's inspired by today: Walmart!
This post is part of my September Creative Challenge. Follow along as Inspired Honey Bee and I do something creative Monday - Friday all this month!  

Saturday, September 10, 2011

Lemon Herb Chicken

I'm always on the lookout for healthy, easy chicken recipes. Months Over a year ago (time flies!) I mentally bookmarked a recipe seen on 12:01am for Lemon Herb Chicken for those two reasons. 

Not only are fresh lemons easy to come by in this neck of the woods, I already had all the other ingredients on hand. So for B's 30th beerthday BBQ I decided to give this recipe a try. I was so happy with the results the first go round that I've made it several times since. If you like lemons*, definitely give this one a squeeze!

1 lb chicken drumsticks or breasts (I've made both ways and prefer the breast)coarse kosher salt
extra virgin olive oil
dried rosemary
dried oregano
pepper
2 lemons


Brine the chicken overnight. This is done by soaking it in a mixture of water, salt and lemon juice. Take a large tupperware container and fill halfway with water. Squeeze one of the lemons into the water and add roughly 2-3 tablespoons of course salt. Add the chicken and refrigerate overnight.


In the morning, remove the chicken from the water. Pat it dry with a paper towel and place in a medium casserole dish. Drizzle olive oil across the chicken. Sprinkle on the kosher salt, pepper, oregano and a generous amount of rosemary. Cover and re-refrigerate.

Before cooking, squeeze half of the second lemon over the chicken. You can also slice the other half and place in with the chicken for extra flavor. Bake in the oven (covered with tin foil) at 400 degrees for roughly 45 minutes. For last 5 minutes, remove the foil and broil. 

I've severed this with a variety of sides. I suggest this Chickpea Salad or with quinoa, red pepper, cucumber and feta salad pictured above (cannot find link, sorry!).

Enjoy! 

*It should probably go without saying - if you don't like lemon you might not like this recipe.

Friday, September 9, 2011

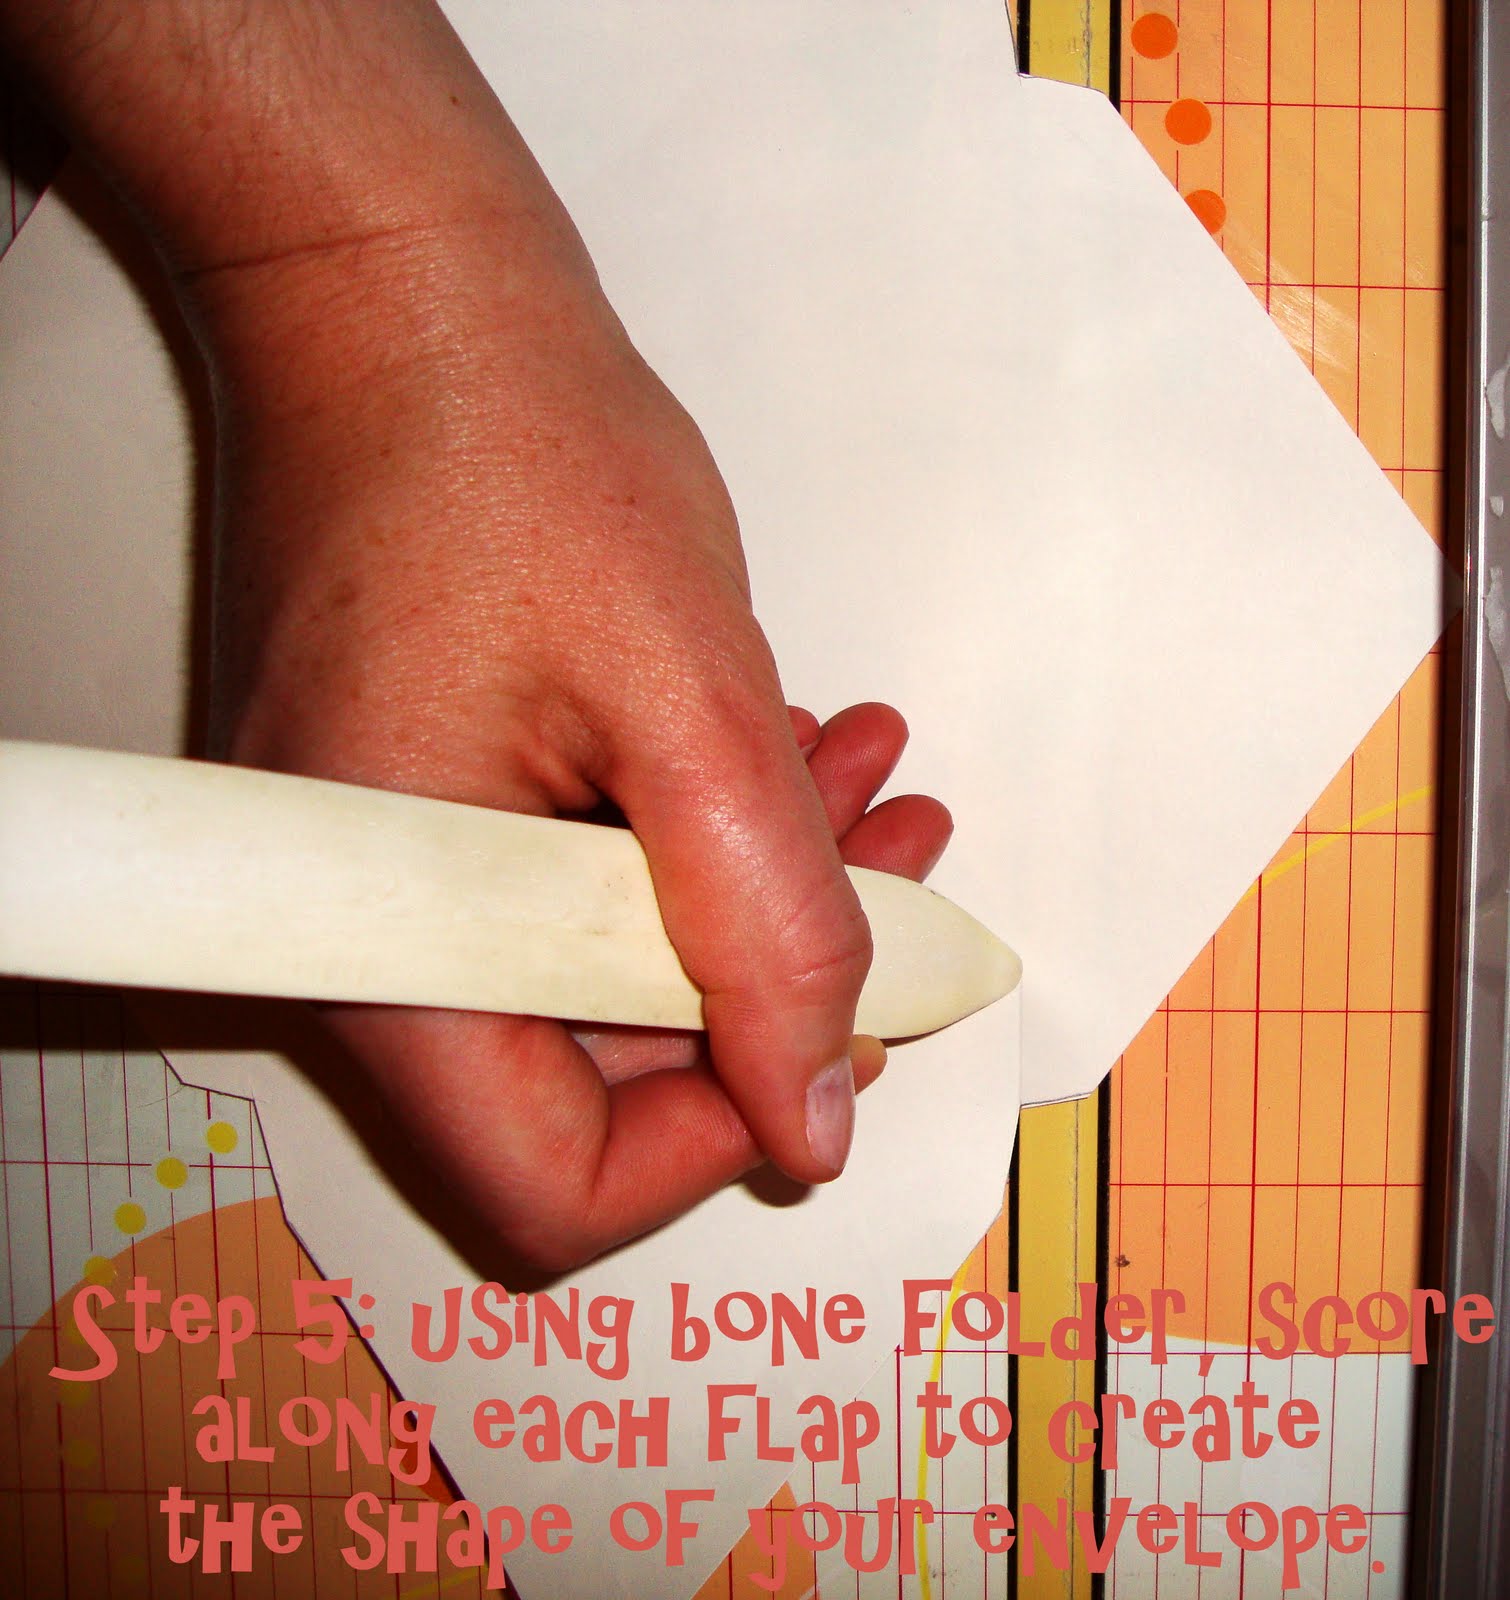
How to: Make Custom Envelopes

Happy Friday! Big creative plans this weekend or is that just me? If you're looking for an idea, how about custom envelopes! They're fairly simple and make a such a nice statement when they arrive in the mail.

I realized I've shown my custom envelopes (here, here and here) and given brief directions, but never an actual tutorial. So without further ado, on to the how-to...


Paper from: Paper Source. Isn't it pretty?

I made my template by deconstructing an envelope the same size as the cards I made. It was extremely easy. If you'd prefer to use a more professional template, Paper Source sells an Envelope Template Kit.


That wraps up another week of the September Creative Challenge! Thank you for following along and all your sweet comments. If you're hoping to do some creative projects around the house this weekend, check out what Inspired Honey Bee's been up to this week. See you back here on Monday with more fun projects!