Friday, December 16, 2011

Pinterest-a-thon: Rein-beers

At the office we are doing a holiday "secret elf" exchange. I drew a guy's name, which has been a tad challenging because I have only met him once. I've tried my very best to get thoughtful, manly stuff while sticking to the strict $15 budget. 

Today is the big elf reveal and I could not, for the life of me, think of what to give as a final gift. That's when I realized, just because I have a guy doesn't mean I can't still do something a little crafty. You know how much I love making gift 6 packs (see birthday, baby), so this rein-beer 6 pack seemed like a fun and festive idea!

Pinterest Inspiration
After confirming he drinks alcohol and that my idea wasn't too lame or inappropriate for the office (since I am the new girl and all), I purchased the supplies to make my very own 6 pack of rein-beers!


It was SO EASY to put together and cost me approximately $12.


Supplies:
6 pack of beverages - I went with New Belgium Trippel
Brown pipe cleaners
Small multi-colored pom-poms
Wiggley eyes
Wrapping paper
Glue and scissors


 1. Unload the beers. Wrap the base of the 6 pack box or leave it plain, especially if the beer is a winter ale!
2. Wrap pipe cleaner around bottle top and make bunny ears. Kink into desired antler shape. Add an extra piece of pipe clear if you want larger antlers.
3. Glue on googly eyes.
4.Glue on a small pom-pom nose. I used one red pom-pom for Rudolph and brown for the rest. Ta-da: rein-beer!


I put them all back into the box their sleigh and attached a Santa gift tag. Hello - someone's gotta be a designated driver.
 

Since you cannot buy wiggley eyes, pom-poms or pipe cleaners individually AND this was so fun, I will be making more of these rein-beer 6 packs in the future!

Pinterest-a-thon: Snowman Ornament

Last but certainly not least, today is my final guest post for the week written by Adriane! I met Adriane during the conference but did not get a chance to get to know her until we were back in the office. She's super sweet, funny, also a CSU ram (lots of rammies in our Boulder office) and works out at 24 hr Fitness so we've taken a few classes together. Thanks for sharing your project, Adriane!


Pin-spiraiton
 Every Christmas we get my Mom a snowman ornament – so this year I decided to make mine! My project was inspired by this pin, originally see on Craft Goodies.

After an hour-long trip to Michael’s, in which I spent way more than I needed to on Christmas decorations, I came home with Styrofoam balls, yarn, wire, buttons, and burlap.

I started out by wrapping three Styrofoam balls in yarn (takes longer than you’d think), and glued them together to create the body. The original post used black furniture tacks for the buttons, but I rebelled and chose the genius route of hot-gluing – wait for it – four buttons to the body. I then used 20 gauge wire to makes the arms and hat, and cut a burlap scarf to complete the project!


Thursday, December 15, 2011

Pinterest-a-thon: Ruffled Pillow

Today is my second guest post this week written by Jen! Jen is a Meeting Planner and has been the primary person to train me in my new role. I shadowed her the entire week at the conference and we traveled together to Boston, Miami and Tampa for site visits. I feel so lucky to be learning from her, as she is amazing at her job. In addition to all the work and travel time we've spent together she also includes me in social activities. In short: she rocks and I'm grateful! Thank you for sharing your project, Jen!


Having totally fallen in love with the diy ruffled pillow I knew it was exactly what I wanted to create when I was challenged to actually follow up on a pin and create something myself! Since the original pin only included a series of pictures for instructions I hit the web to find some additional instructions and landed on ruffle pillow {by Jess} from Floral Showers. I combined the two with my ultimate vision and created exactly what I wanted.

The tutorial suggested using an extra large t-shirt and stuffing, instead I purchased one yard of beautiful blue/gray striped taffeta and two 16” x 16” pillow forms.


Step 1: Slice that fabric
Taffeta has a tendency to fray, and since I was concerned with the inside seams of the pillow falling apart I decided that I would sew French seams for all my interior seams. Since French seams would need more seam allowance I cut the front of my pillow at 17” x 17” and wanting the back of the pillow to be an envelope, I cut two back pieces that would overlap, 12” x 17” and 9” x 17”. My rotary cutter made it extremely easy to slice nine 1.75” x 25” strips which would become the ruffles. The ruffle strips need to be cut considerably longer than the final pillow size as they will become shorter once ruffled.


Step 2: Sew those ruffles
To create the ruffles I sewed a basting stitch (long stitch) down the center of each strip. I then laid each strip on the pillow front and tacked them down by sewing ¼” seam through the top of each strip.


Begin to ruffle!
This was the best part of the project! To create the ruffles I simply pulled the bobbin thread causing the strips to scrunch up until they were 17” long (be sure to hold the threads at the opposite end from where your pulling and don’t pull too hard). I then went back to the sewing machine and sewed each of the strips down their center onto the front of the pillow. If your original basting seam is showing you can easily pull the threads out, making the pillow top look cleaner.


To complete my ruffle pillow I laid the two back pieces of the pillow so that they overlapped (to create the envelope) and then laid the ruffled top on top of them so that the wrong sides of the fabric were against each other. I then sewed the front to the back around the perimeter using ¼” seam allowance, be sure not to sew the ruffles down (Part 1 of the French seam). I then turned the pillow inside out and again sewed around the perimeter of the pillow using ¼” seam allowance (Part 2 of the French seam). Once again I turned the pillow right side out and I had a ruffled pillow cover! To finish I just put the pillow forms into the pillow cover using the envelope opening in the back.

front - ruffles!

back - envelope

Hardest part of the entire project was dealing with my
poorly trained cat that not only continually jumped on the
table, but also attacked fabric as it came out the backside of
the sewing machine. Good thing she's cute!

Wednesday, December 14, 2011

Pinterest-a-thon: Braided Scarf


Today is my first guest post this week, written by Ashlan! I met Ashlan while waiting to catch the plane to Philadelphia. I saw a group of people who I thought might be from my new work. A few minutes later I heard my name, first and last, followed by "she has a blog...that I've been stalking." That's when I walked up, introduced myself and embarrassed the heck out of poor Ashlan. I've learned she's crafty, a runner and hilarious, which all make up for the fact she went to CSU ;) Thanks for sharing your project, Ashlan!


Using the braided scarf tutorial from Put Up Your Dukes, I stopped pinning and started crafting! Here's the original Pinterest post.

The tutorial advises using two 60"x15" strips of fabric and suggests  using an old t-shirt as an inexpensive and green fabric source. However, you need XXL tees and my husband doesn't really have much color variety in his collection. I purchased half a yard of each color in a knit fabric instead.

I suggest using the tutorial mentioned above because, unlike me, I bet that she didn't sew a pin into her project. If you're the adventurous type, go ahead, see if you can figure it out with my pics.
 
Step 1: Show Me Your Tubes
Sew two tubes. Mine are 7.5" wide by 58" long. Turn 'em inside out when you're done.

Step 2: Do your tubes low? Do they wobble to and fro? Can you tie 'em in a knot? Can you tie 'em in bow?


Overlap your tubes.


Put your hand through the loop on the bottom. Grab the tails of that loop and pull 'em through.


Flip the piece over.
Put your hand through the other loop and pull it's tails through.


Step 3: Sports Bra (combine your tubes)
Sew the opposite colors of each tube together. Make sure they're not twisted and that you're sewing the insides of them together. See tutorial for more pictures.

Step 4: Wrap the One You Love in Your Tubes!

Tuesday, December 13, 2011

Yarn Wrapped Holiday Wreaths

Today I am guest posting on Inspired Honey Bee for her holiday Pinterest-a-thon.  Using left over yarn from the yarn wrapped letters I made back in September I made not one but two holiday wreaths: one for our front door and one for my office door!


Want to join the Pinterest-a-thon party? Link up your Pinterest holiday project right here.

Monday, December 12, 2011

Pinterest-a-thon: Round 2

Wowsers - time flies! It's already been a month since our last Pinterest-a-thon and sadly since my last post. Well good news - I'm back and very excited to share my project with you tomorrow! 

In addition to the posts this week on Inspired Honey Bee's blog, I've recruited a few lovely ladies from my new office to share some Pinterest projects they've whipped up. How awesome that I have crafty ladies at work? I KNOW! 

So basically this week you'll get DOUBLE the fun and amount of Pinterest-a-thon posts by stopping here and Inspired Honey Bee to see the original crew. Have a project you'd like to share? Join the fun by linking up on Inspired Honey Bee Linky Party #2

Huge thank you to Debbie for pulling this all together and including me in the fun again this month.  XO

Sunday, November 13, 2011

Pinterest-a-thon


Hi friends! Long time no post, I know. Life has been a whirlwind. Good news is that I'm BACK...at least for today. I was asked by Debbie to join her and three other very lovely ladies to do a Pinterest-a-thon. The idea is to create actual real life projects from all the wonderful inspiration we've pinned. One week per month Debbie is sharing these projects on her blog.


Today I'm sharing my project - Anthropology inspired zinc letters for our kitchen. Hop on over to Inspired Honey Bee to check it out! Here's a sneak peek of the finished project and our new kitchen....

Want to join the party too? Link your Pinterest inspired projects right here!

Disclaimer: this little project of ours is not sponsored by Pinterest. We're just really obsessed. Like really!

Monday, October 17, 2011

Motownphilly


Well, we survived the road trip from California, arriving to Denver on Friday (more on that soon!). After a quick unpack/repack transition, on Sunday I flew to Philadelphia to start my new job

 When I received my job offer, it came with a start date during their annual conference. I was, and still am, pretty excited for the opportunity to experience the largest event I'll be helping to plan. After I accepted the position and was booking my flight to Philly, this song popped in my head and has been there since, thus the name of this post.

Today was my first real day on the job. I spent the better part of an 11 hour day shadowing one of my new co-workers who graciously answered all my questions and introduced me to everyone. I have been warmly welcomed by the entire staff and heard a lot of "wow, trial by fire" and "they're really throwing you in". True, its overwhelming and I have no idea what time zone I'm really in, but I am so thankful for this experience. I know that when it's time to contribute to the planning process I'll have an idea of what they're talking about.

As for actually seeing Philly, I think this photo, taken tonight from the 33rd floor of the Loews Hotel, and quick walks from my hotel and the Pennsylvania Convention Center might be the most of what I see...this time.

Sunday, October 9, 2011

Hittin' the road


The time has come, we are saying good bye to the Bay Area and hittin' the road! Brian flew in last night so we can make the trip together. When he moved two months ago we did not have the gift of time, so we made the trip in two days. Thankfully we now have a whole week so we decided to make a scenic road trip out of it!

Today we'll drive down Highway 1 from the Bay Area to Morro Bay, just outside of San Luis Obisbo, and will camp on the coast. Monday we continue down the coast to Orange County to see my family. Tuesday we will leave the coast and head east to the desert to see the Hart family. Wednesday we're heading to the South Rim of the Grand Canyon. I've never seen the Grand Canyon so I'm really excited for that! Wednesday night we're staying in Flagstaff with Brian's brothers friend. Thursday we'll head northeast to Durango, with a few park stops along the way. Thursday night we'll stay with the Kruegers. Friday we'll drive the rest of the way to Denver aka our new home!


It has not hit me that in 2 hours I will be on the road leaving California. I have lots to write about my time here but ran out of time to write it all before getting on the road. So stay tuned, but as everyone who reads this already knows...I am so excited to move back to Colorado but will definitely miss my home away from home, California.

Monday, October 3, 2011

Baby Banner Gift Bag

Over the weekend was a baby shower for Chelsea and her little fella, who is due at the beginning of December. Although it would have been so great to be in Durango to attend, it just wasn't possible to get there. More possible was wrapping up some cute clothes and mailing them for the shower!

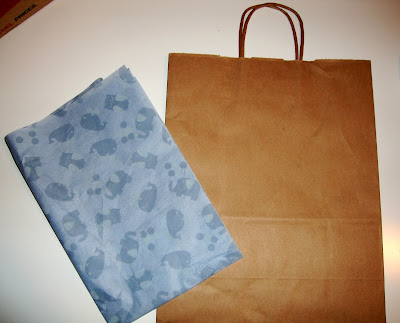
It's always tricky to mail a gift to be presentable for a shower. You never know if the wrapping will survive the trek. At the advice of IHB, I decided to wrap the items in the adorable tissue paper provided by Baby Gap and mail them with a gift bag to be assembled prior to the shower!

I didn't find a gift bag that coordinated with the tissue paper, so I decided to make my own! I choose a brown kraft paper bag to work with.

You know how I feel about banners, especially for babies (see here and here), so I pulled out this stamp as my inspiration.

To make a baby sized banner for the bag, I cut four banner flags out of this fun blue chevron paper.

Using the Cricut I cut four denim colored circles and paired them with the letters b-a-b-y (using scrap paper from this project).

I glued all the pieces together, lay them out on the gift bag and FAIL. Baby banner is too big for the bag!! I mostly wanted to share this picture to prove that projects do not always pan out as planned, but you probably already knew that :)

I quickly changed my plan and went for round circles and baby fit perfectly! Hooray, tragedy averted!

I punched a small hole on each side of the bag and strung the banner on some twine. I then tied the banner onto the gift bag.

Ta-Da: Baby Banner Gift Bag!


After I snapped this picture, I unpacked the bag and carefully placed all the items in a box. I mailed all the items to Chelsea's mom who kindly re-assembled the bag and took it to the shower on my behalf!

I think today marks two months until we all get to meet Baby Krueger! I cannot wait to snuggle him in this. In the meantime, we can gush over this new cute fella, Dylan Teuber, who was born last week!! Congrats to his parents Lisa & Doug! 

Friday, September 30, 2011

Do something creative everyday!

{pinned}
  
In case you didn't get the memo - its Friday!! For me that means: pay day, last day of the month, one week until my last day at work and the end of September Creative Challenge! This month Inspired Honey Bee and I challenged ourselves to do something creative everyday (Monday - Friday) and share it on our blogs. Well, we made it to the end and I managed all but one post. Not too bad consider all the life changes going on around here (move, job)!

 In honor of the last day of the challenge, I want to celebrate creativity by sharing some creativity prints and quotes I've pinned. I hope this challenge and these prints inspired you to bring creativity into your daily life. I know I cannot imagine my life without creativity. In an effort not to repeat myself, I will simply say I am still very thankful for creativity.


{pinned}


{pinned}

{pinned}


{pinned}


{pinned}


{pinned}


Thank you for following along!

XOXO, enchelleada

Thursday, September 29, 2011

My favorite Wall Art Calendar!

It's that time of year again: Pumpkin Spice Lattes, fall leaves, boots, scarves and the new PS Wall Art Calendar!! You would think I am getting a free calendar for as much as I continue to profess my love for them year after year. Unfortunately I do not, and that's ok. To me its worth the $29.50 to have a beautiful, recycled paper (100% recycled material, 30% post consume) calendar while at work and also completely reusable (templates on the back of each month); it's a no brainer for this tree hugging, paper lover.
2012 Paper Source Wall Art Calendar

As you can see, the 2012 calendar does not disappoint! I especially love June's sea theme, July's gray and green, September's owls (Ash!) and the Aspen trees in November.


Before I allowed myself to buy the 2012 calendar for my future workspace, I made a deal with myself to use all of the old calendars I had on hand. You may remember I did this last year as part of the challenge (see here). So why would I have extra calendar pages to use? Well my friend/coworker fell in love with the calendar and bought one for herself. She's not extremely crafty so she gave me her calendar at the end of the year. 


In the spirit of sharing is caring, a commonly used line by said friend/coworker, I decided to make all the cards, gift tags, pillow and square boxes to give back to her. I spent about two hours in front of the tv cutting, folding and gluing them all together.

Once they were dry I stacked them together and wrapped them with gray twine to look like gifts
!
I left them on her work chair first thing in the morning. She was so surprised I still had them and then proceeded to cry. I got teary eyed too, beautiful paper can do that! Ok, its actually because I'm leaving in a few days. I will miss her dearly and am so happy I was able to make her day by regifting her own calendar, in gift box form. Like paper, friendship is a beautiful thing.


Purchase your very own Paper Source Wall Art Calendar here. You're welcome ;) 

This post is part of my September Creative Challenge. Thanks for following along as Inspired Honey Bee and I do something creative Monday - Friday all this month.

Wednesday, September 28, 2011

Wedding Inspiration

From my haphazard, undocumented research I've come to the conclusion the two most common questions asked when you get in engaged are: when's the big day? and what are your wedding colors? Thankfully, at least with regard to the color question, I had a pretty good idea of what I really liked: plum purple, green and gray. Thankfully B agreed (or did not protest too loudly).


If you are talking in Paper Source colors - that's beet, clover and gravel to you. And if you are talking about our beloved rain jackets - its grapes and gray, like the foggy bay area skies.


With colors and a venue selected, on to the real fun: details! It is no secret that I love details, specifically wedding and party details. It has been so fun looking for inspiration on blogs, magazines and pinterest. However, all that loveliness also makes it really hard to narrow down all the ideas. So believe me when I say it was a true creative challenge to put together an inspiration board.

{click to enlarge}
What I hoped to capture and continue to be inspired by for our big day:
- love and laughter
- a celebration of our journey
- the friends and family who've surround and support us
- handmade details
- rustic: Colorado chic, wood details that compliment the Inn/gardens
- eco-chic: environmentally friendly, local food,  ect
- beautiful flowers mixed with succulents, eucalyptus, kale


While this doesn't encompass all aspects of our wedding day, it feels like a really great start! I, of course, also reserve the right to change my mind but hope to stick to these inspirations.


Inspiration from: 1 | 2 | 3 | 4 | 5 | 6 | 7 | 8 | 9 | 10


 This post is part of my September Creative Challenge. Thanks for following along as Inspired Honey Bee and I do something creative Monday - Friday all this month. Final week!